So, I hope, prior to reading this tutorial you have read my previous post laying down some fundamental ideas we sort of need before we start to look at creating shaders. If you haven't, then please, hop back and have a read of it here, or simply click the << Previous links at the top and bottom of this post.
Ill repeat my caveat here, I am no shader or Unity expert, these posts are based on what I have found through my own exploration of shaders in Unity, but I hope what you find here gives you some pointers and ideas for your own shaders and adventures creating shaders :)
Unity gives us a few shader types that we can write, surface shaders, as well as vertex and fragment shaders.
If you are coming from XNA/DX vertex shaders are the same as DX9 vertex shaders and fragment shaders are the analogue of pixel shaders. In XNA there is no analogue with surface shaders.
If you have no experience of shaders at all, then I had best describe to you the difference of each of these shaders.
Vertex Shader
A vertex shader is a function that runs on the GPU, it takes a single vertex (as described in the last post) and places it on the screen, that is to say if we have a vertex position of 0,0,0 it will be drawn in the centre of out mesh, if the mesh then has a position of 0,0,10 the vertex will be drawn at that position in the game world. This function returns this position data, as well as other data back to the graphics pipeline and this data is then passed, after some manipulation, to the pixel shader, or in the case of Unity, it may be passed to a surface shader, depending how we have written it.
A vertex shaders calculations are done on each vertex, so in the case of our quad from earlier, this would be executed 6 times, once for each point of the two triangles the quad is made up of.
Pixel Shader
The pixel shader is given each and every pixel that lies with in each of the triangles in the rendered mesh and returns a colour. As you can imagine, depending on how much of the screen your mesh takes up, this could be called once for every pixel on your screen!! Needless to say pixel shaders are more expensive that vertex shaders.
Surface Shaders
These are a strange halfway house between the vertex and pixel shader. You do not need to create a vertex shader with a surface shader as Unity will use it’s default one, but you can if you need one, we will cover that later. It comes with a set of predefined elements that will automatically use the Unity lighting model. You can write you own lighting calculations too which is quite cool, but, like anything else, you don’t get something for nothing, they will have an overhead, but if I am honest, I have not had too many issues with them.
I think the first shader we should look at is the Unity Surface shader. These shaders are a great way to start as they do a lot of work for you, you don’t have to worry about all the lighting calculations, if forward rendering or deferred rendering is being used, all we have to do is worry about the colour out put.
Create our first Surface Shader
From within your Assets folder, create a few new folders called Shaders, Materials and Scripts.
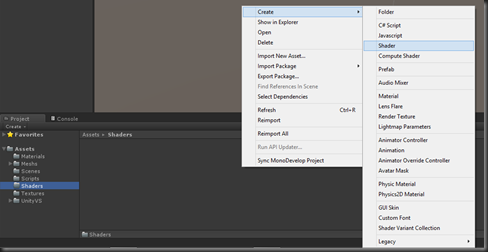
In the Shaders folder, we will create out first surface shader, right click in or on the shaders folder, select Create, then Shader
Call this first shader SSOne. Lets take a look at what we get just by creating this shader file.
Shader "Custom/SSOne"
{
	Properties
	{
		_MainTex ("Base (RGB)", 2D) = "white" {}
	}

	SubShader
	{
		Tags { "RenderType"="Opaque" }
		LOD 200

		CGPROGRAM
		#pragma surface surf Lambert

		sampler2D _MainTex;

		struct Input
		{
			float2 uv_MainTex;
		};

		void surf (Input IN, inout SurfaceOutput o)
		{
			half4 c = tex2D (_MainTex, IN.uv_MainTex);
			o.Albedo = c.rgb;
			o.Alpha = c.a;
		}
		ENDCG
	}
	FallBack "Diffuse"
}
First things first, I removed the silly java style brackets, the ones that have the opening ‘{‘ bracket on the same line as the condition or definition, they should always be on the next line in my opinion ;)
So, we have a few things going on in this file already, we will look at them in turn moving down through the file.
Shader Name
At the top we have the Shader name in quotes, with this field we are also able to change how unity displays it in the list of shaders when we go to add it to a material.
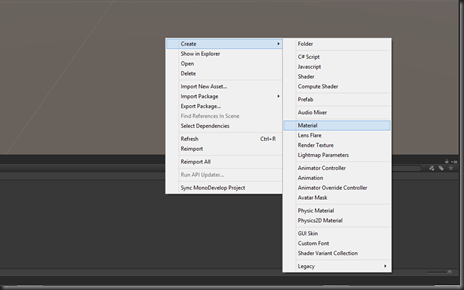
Lets create a material to add this new shader to, in the Material folder, right click on or in it, select create then Material like this
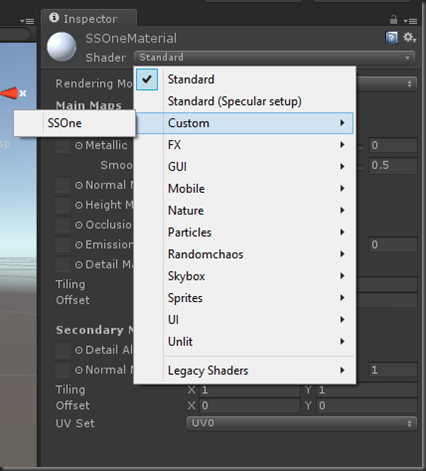
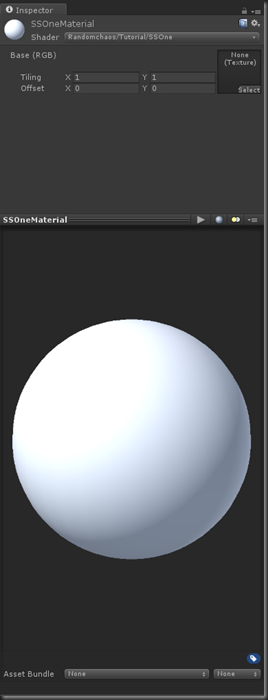
Name this material SSOneMaterial, we can now add our new shader to it. Click the shader combo box, our shader is in Custom select that option and you will be able to see the shader in the list
Lets change the name and location of our shader, so change the header from
Shader "Custom/SSOne"
{
To
Shader "Randomchaos/Tutorial/SSOne"
{
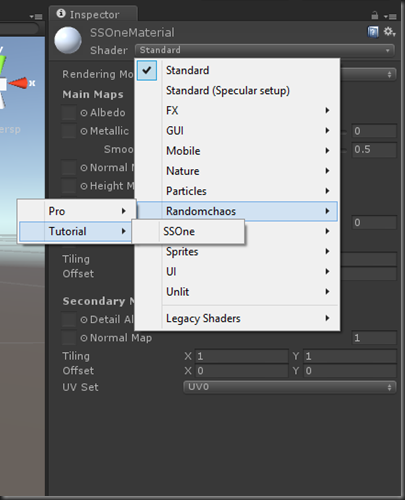
If we go to add it now, it looks like this
Shader Properties
The properties section defines any variables we want to pass to the shader. At the moment, in the file created by unity, we only have one variable and it’s a texture to be used in this shader. There are a few different types of parameters that can be passed. Before we look at the types, lest look at the definition of the parameter we currently have.
_MainTex ("Base (RGB)", 2D) = "white" {}I guess the “signature” of these parameters is as follows
<param name> (“UI Description”, type) = <default value>
So, for our current parameter it has the name _MainTex, the description that will be shown in the UI is “Base (RGB)” and the type is a 2D texture, it’s default value is white, lets look at that in the UI.
We have a few options when it comes to parameters
Property Type | Description |
| Range(min,max) | Defines a float property, represented as a slider from min to max in the inspector. |
| Color | Defines a color property. (r,g,b,a) |
| 2D | Defines a 2D texture property. |
| 3D | Defines a 3D texture property. |
| Rectangle | Defines a rectangle (non power of 2) texture property. |
| Cubemap | Defines a cubemap texture property. |
| Float | Defines a float property. |
| Vector | Defines a four-component vector property. |
SubShader
The next bit of this file is where all the work is done.
The first thing we see is the Tag, we have a few elements to this part of the Unity Shader file, we can control quite a few things from here
At the moment it looks like this
Tags { "RenderType"="Opaque" }So, as you can see we are using one tag type in there called RenderType and it’s set to Opaque, so no transparency.
So what tag types are there?
Tag Type | Description |
Queue | With this tag type you can set what order your objects are drawn in. |
| RenderType | We can use this to put our shader into different render groups that help Unity render them in the right way. |
| ForceNoShadowCasting | If you use this and set it to true then your object will not cast any shadows, this is great if you have a transparent object. |
| IgnoreProjector | If used and set to true, this will ignore Projectors, now until I decided to write this tutorial I have never heard of these, but they do look useful :D |
Lets look at the available values that can be used for Queue and RenderType
*Descriptions ripped from the Unity docs ;)
We wont use the queue tag, but it’s nice to know how we can use them, you never know, later on, a few posts down the line we might use it.
Queue Value | Description |
| Background | This render queue is rendered before any others. It is used for skyboxes and the like. |
| Geometry (default) | This is used for most objects. Opaque geometry uses this queue. |
| AlphaTest | !lpha tested geometry uses this queue. It’s a separate queue from Geometry one since it’s more efficient to render alpha-tested objects after all solid ones are drawn. |
| Transparent | This render queue is rendered after Geometry and AlphaTest, in back-to-front order. Anything alpha-blended (i.e. shaders that don’t write to depth buffer) should go here (glass, particle effects). |
| Overlay | This render queue is meant for overlay effects. Anything rendered last should go here (e.g. lens flares). |
Again, at the moment we are not too concerned with these tags, but it’s good to be aware of them.
RenderType Value | Description |
| Opaque | Most of the shaders (Normal, Self Illuminated, Reflective, terrain shaders). |
| Transparent | Most semitransparent shaders (Transparent, Particle, Font, terrain additive pass shaders). |
| TransparentCutout | Masked transparency shaders (Transparent Cutout, two pass vegetation shaders) |
| Background | Skybox shaders |
| Overlay | GUITexture, Halo, Flare shaders |
| TreeOpaque | Terrain engine tree bark |
| TreeTransparentCutout | Terrain engine tree leaves. |
| TreeBillboard | Terrain engine billboarded trees |
| Grass | Terrain engine grass. |
| GrassBillboard | Terrain engine billboarded grass. |
LOD
Our shader currently has the value 200, this is used when you want to restrict your shaders, so when deploying to certain platforms you may want to disable shaders > LOD 200. You can check out the the settings that the default shaders come with here. Again, this just for information, we won’t be playing with this value, in fact, we could probably remove it.
CGPROGRAM
This is where our shader code starts.
#pragama
The pragma is telling the unity compiler what shaders we are using. In this pre generated shader, this is a surface shader, it is then followed by the function name for the shader, in this case surf and if a surface shader the followed by the type of lighting algorithm to use, in this case Lambert. There are a few lighting algorithms, in hlsl I have written a few, Unity comes withe Lambert and BlinnPhong. What I do like about surface shaders is we can write our own lighting algorithms too, and we will come to that later.
Shader Variable Declarations
We have a parameter defined at the top, but we then need to create a variable for in inside the CGPROGRAM section, and parameters set that we want to use in the shader need to be duplicated here. We can also declare variables here that are not passed as parameters if we want to too. In this shader we have just the one
sampler2D _MainTex;
Shader Structures
This is where we define the structures to be used that describe the vertex data we are passing in and the data we are passing to other shaders. In this surface shader we are just getting data for the pixels inside each triangle, like a pixel shader, so Unity will have already ran a vertex shader for us and then it will pass the data we require as laid out in the structures defined here.
Defined here is a structure called Input
		struct Input
		{
			float2 uv_MainTex;
		};
It is going to pass us the texture coord for the given pixel so we can then use that to get a texel (not pixel) off the texture passed in for the given coordinate.
How on earth does it do that and what is a texel!?!?!?!
OK, this bit is a bit funky :) Remember we set up those texCoords in our earlier runtime quad code
        // Set up text coords
        texCoords.Add(new Vector2(0, 1));
        texCoords.Add(new Vector2(0, 0));
        texCoords.Add(new Vector2(1, 0));
        texCoords.Add(new Vector2(1, 1));
We said that the top left corner was 0,0 and the top right was 1,0, well when this information is given to the surface or pixel shader it is interpolated, that is to say, when we get given the pixel(s) between the top left corner and top right corner they will be in the range of 0,0 and 1,0. So if the pixel being sent to the surface shader is slap in the middle and at the very top of the mesh, it would have the uv_MainTex value od .5,0. If it was the pixel in the very centre of our rendered quad then uv_MainTex value would be .5,.5. So by using this mapping we can get the right texel from the texture passed in.
Texel = TEXt ELement, the GPU can’t work on a pixel to pixel mapping, the texture you pass could be 32x32 pixels and the area your mesh covers could be, well, the whole screen or 16x16, so the GPU needs to use the texture coordinates to pull out the colour at that point. To do that on a pixel by pixel basis, just would not work…
Surf
And now, the part you have all been waiting for, the actual shader it’s self…
		void surf (Input IN, inout SurfaceOutput o)
		{
			half4 c = tex2D (_MainTex, IN.uv_MainTex);
			o.Albedo = c.rgb;
			o.Alpha = c.a;
		}
This is being call for each and every pixel that your mesh is showing to the camera. The function is being passed the Input structure, as I have explained above this will have the interpolated data for the given pixel with regards to the mesh. There is also an inout parameter, SurfaceOutput o. This structure will be populated by this function then handed onto the rest of the Unity surface pipeline to have the lighting applied to it.
The SurfaceOutput structure is pre defined in Unity and looks like this
struct SurfaceOutput {
    half3 Albedo;
    half3 Normal;
    half3 Emission;
    half Specular;
    half Gloss;
    half Alpha;
};
All that is getting populated here is the Albedo and the Alpha. The Albedo is the colour of the surface to be returned for this particular pixel and the Alpha is the corresponding alpha.
ENDCG
Denotes the end of your shader code
Fallback
This is the default shader to use should this shader be unable to run on the hardware.
Play Time
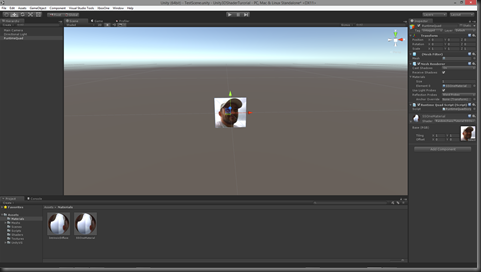
So, that was a lot of waffle, lets look at altering this shader so we can see how some of it works. First we need to use our new material on our rendered object, now you can use our runtimequad or add a new model to the scene and set it’s material to our new SSOneMaterial.
Once you have assigned the new material, give it a texture.
Run this and we can see (or you should) that it runs as it did before with the other shader.
Lets add a new parameter to the shader. In the Properties section add a new property _Tint like this
	Properties
	{
		_MainTex ("Base (RGB)", 2D) = "white" {}
		_Tint ("Color Tint", Color) = (1,1,1,1)
	}
We need to also set up a variable for this, so under sampler2D _MainTex; add a float4 (a colour is a float4)
		sampler2D _MainTex;
		float4 _Tint;
We can now use this value to tint the image that we out put like this
		void surf (Input IN, inout SurfaceOutput o)
		{
			half4 c = tex2D (_MainTex, IN.uv_MainTex);
			o.Albedo = c.rgb * _Tint;
			o.Alpha = c.a;
		}
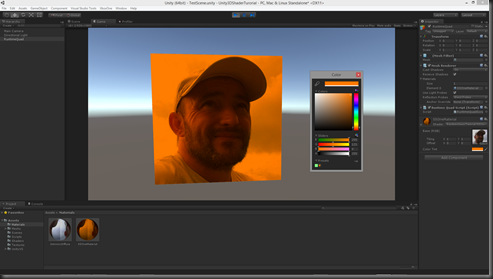
Now, go back to Unity, run the scene, select your object, pick the Tint colour picker and you will see the image get tinted at run time, this can be done in the scene screen when not running too.
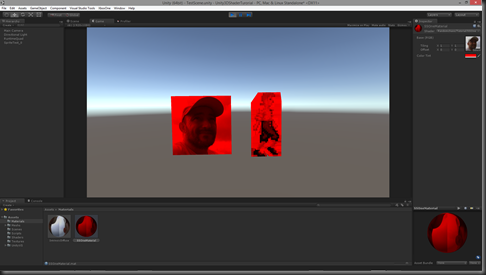
Oh, and just to show you can use these 3D shaders with 2D graphics, here is an image of the sahder being used on both a 3D quad and a sprite at the same time.
Naturally, our shader at the moment is not taking into account the alpha for the sprite, but we can sort that out later, for now, just be clear, what ever we render in 3D with shaders we can do in 2D as well, they are the same thing…
As ever comments and critique are more than welcome. The next post we will look at a few more tricks we can do in the surface shader and if I have time take a look at writing out own lighting model for our shader.
No comments:
Post a Comment